Connecting to an iSCSI SAN with Jumbo Frames enabled
09 Jul 2011 by Simon Greaves
The best way to add iSCSI storage is by utilizing dedicating NIC’s to iSCSI traffic, on dedicated VMkernel switches, with separate IP subnet address ranges and separate physical switches or VLAN’s.
Enable Jumbo Frames on a vSwitch
To enable Jumbo Frames on a vSwitch, change the MTU configuration for that vSwitch. It is best to start with a new switch when setting this up as you will need to delete the existing port groups in order to allow jumbo frames to pass through the port group.
In order to run the necessary commands connect to the host using the vSphere CLI which can be downloaded from the VMware website.
To run a vSphere CLI command on Windows
Open a command prompt.
Navigate to the directory in which the vSphere CLI is installed.
cd C:\Program Files\VMware\VMware vSphere\CLI\bin\
Run the command, passing in the connection options and any other options.
<command>.pl <conn_options> <params>
The extension .pl is required for most commands, but not for esxcli.
Example
vicfg-nas.pl --server <my_vcserver> --username <username> --password <mypwd> --vihost <my_esxhost> --list
Procedure
Create a new vSwitch and assign the appropriate uplink. Open the vSphere CLI and run
vicfg-vswitch --server <my_vcserver> --username <username> --password <mypwd> --vihost <my_esxhost> -m MTU vSwitch
This command sets the MTU for all physical NICs on that vSwitch. The MTU size should be set to the largest MTU size among all NICs connected to the vSwitch.
Run the vicfg-vswitch -l command to display a list of vSwitches on the host, and check that the configuration of the vSwitch is correct.
Create a Jumbo Frames-Enabled VMkernel Interface
Use the vSphere CLI to create a VMkernel network interface that is enabled with Jumbo Frames.
On the vSphere CLI, run the vicfg-vmknic command to create a VMkernel connection with Jumbo Frame support.
Procedure
vicfg-vmknic -a -I <ip address> -n <netmask> -m MTU <'port group name'>
Check that the VMkernel interface is connected to a vSwitch with Jumbo Frames enabled.
Run the vicfg-vmknic -l command to display a list of VMkernel interfaces and check that the configuration of the Jumbo Frame-enabled interface is correct.
Configure all physical switches and any physical or virtual machines to which this VMkernel interface connects to support Jumbo Frames.
Create Additional iSCSI Ports for Multiple NICs
Log in to the vSphere Client and select the host from the inventory panel.
Click the Configuration tab and click Networking.
Select the vSwitch that you use for iSCSI and click Properties.
Connect additional network adapters to the vSwitch.
In the vSwitch Properties dialog box, click the Network Adapters tab and click Add.
Select one or more NICs from the list and click Next.
with dependent hardware iSCSI adapters, make sure to select only those NICs that have a corresponding iSCSI component.
Review the information on the Adapter Summary page, and click Finish.
The list of network adapters reappears, showing the network adapters that the vSwitch now claims.
Create iSCSI ports for all NICs that you connected
The number of iSCSI ports must correspond to the number of NICs on the vSwitch.
Procedure
In the vSwitch Properties dialog box, click the Ports tab and click Add.
Select VMkernel and click Next.
Under Port Group Properties, enter a network label, for example iSCSI, and click Next.
Specify the IP settings and click Next.
When you enter subnet mask, make sure that the NIC is set to the subnet of the storage system it connects to.
Review the information and click Finish.
CAUTION If the NIC you use with your iSCSI adapter, either software or dependent hardware, is not in the same subnet as your iSCSI target, your host is not able to establish sessions from this network adapter to the target.
Map each iSCSI port to just one active NIC
By default, for each iSCSI port on the vSwitch, all network adapters appear as active. You must override this setup, so that each port maps to only one corresponding active NIC. For example, iSCSI port vmk1 maps to vmnic1, port vmk2 maps to vmnic2, and so on.
Procedure
On the Ports tab, select an iSCSI port and click Edit.
Click the NIC Teaming tab and select Override vSwitch failover order.
Designate only one adapter as active and move all remaining adapters to the Unused Adapters category.
Repeat the last step for each iSCSI port on the vSwitch.
Configure iSCSI binding to iSCSI adapters
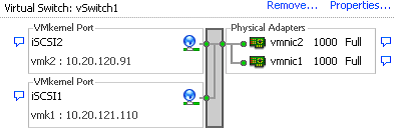
Identify the name of the iSCSI port assigned to the physical NIC. The vSphere Client displays the port’s name below the network label.
In the following graphic, the ports’ names are vmk1 and vmk2.
Use the vSphere CLI command to bind the iSCSI port to the iSCSI adapter.
esxcli swiscsi nic add -n <port_name> -d vmhba
IMPORTANT For software iSCSI, repeat this command for each iSCSI port connecting all ports with the software iSCSI adapter. With dependent hardware iSCSI, make sure to bind each port to an appropriate corresponding adapter.
Verify that the port was added to the iSCSI adapter.
esxcli swiscsi nic list -d vmhba
Use the vSphere Client to rescan the iSCSI adapter.
This example shows how to connect the iSCSI ports vmk1 and vmk2 to the software iSCSI adapter vmhba33.
- Connect vmk1 to vmhba33:
esxcli swiscsi nic add -n vmk1 -d vmhba33 - Connect vmk2 to vmhba33:
esxcli swiscsi nic add -n vmk2 -d vmhba33 - Verify vmhba33 configuration:
esxcli swiscsi nic list -d vmhba33
Both vmk1 and vmk2 should be listed.
If you display the Paths view for the vmhba33 adapter through the vSphere Client, you see that the adapter uses two paths to access the same target. The runtime names of the paths are vmhba33:C1:T1:L0 and `vmhba33:C2:T1:L0. C1 and C2 in this example indicate the two network adapters that are used for multipathing.
The next thing is to configure the switch with the relevant settings. For this I have used two Dell Powerconnect 5448 switches and a Dell EqualLogic PS4000XV SAN, however the information is relevant for most Dell switch and SAN combination and most other brands too. The commands may differ slightly but the principals are the same.
Configuring the iSCSI SAN switches
Turn on flow control on the switches:
console» enable
console#> configure
console (config)#> interface range ethernet all
console (config-if)#> flowcontrol on
Enable Spanning tree and portfast globally
Console (config)#> spanning-tree mode rstp
Console (config)#> interface range ethernet all
console (config-if)#> spanning-tree portfast
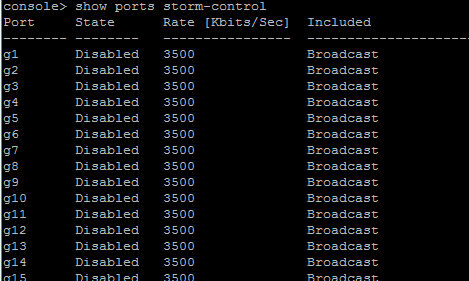
Confirm Unicast Storm Control is disabled with
console#> show ports storm-control
Should return State Disabled as show in the image
Check iSCSI awareness is enabled using
Console#> config
console(config)# iscsi enable
Disable STP on ports that connect SAN end nodes
console (config)#> interface range ethernet g1,g3
console (config)#> spanning-tree disable
console (config-if)#> exit
Enable LAG between switches
Disconnect switches from each other before doing following config on both. Then connect ports 5,6,7, and 8
console (config)#> interface range ethernet g5,g6,g7,g8
console(config-if)#> channel-group 1 mode on
console(config-if)#> exit
console(config)#> interface port-channel 1
console(config-if)#> flowcontrol on
console(config-if)#> exit
Enable jumbo frames on iSCSI ports (This command will enable it on all ports)
console (config)#> port jumbo-frame
This setting will take effect only after copying running configuration to startup configuration and resetting the device.
configure VLANS for vMotion
console(config)#> vlan database
console(config-vlan)#> vlan 2
console(config-vlan)#> exit
console(config)#> interface vlan 2
console(config-if)#> name vMotion
console(config)#> interface range ethernet g2,g4
console(config-if)#> switchport mode general
console(config-if)#> switchport general pvid 2
console(config-if)#> switchport general allowed vlan add 2 tagged
console(config-if)#> switchport general acceptable-frame-type tagged-only
console(config-if)#> exit
console(config)#> interface vlan 2
console(config-if)#> ip address 10.10.10.1 255.255.255.0
console(config-if)#> exit
console(config)#> exit
console#> copy running-config startup-config
Overwrite file [startup-config] ?[Yes/press any key for no].
Console#> reload
Log into switch and set name and time synchronisation options.
Tagged with: vSphere Command Line
Comments are closed for this post.